
WarpRunner THC
Price
WarpRunner THC
Product Description

WarpRunner THC, This is for High End Application
Overview
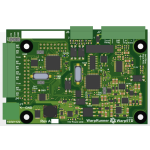
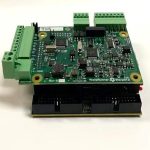
The WarpRunner is a Torch Height Controller that plugs on top of the ESS and commands velocity-based up and down moves for your Z axis to achieve the optimal cut based upon your settings. This is also a BOB (Break Out Board) that provides 8 additional outputs (for up to 4 motors or axes) and 2 additional 24V (or 12V) optoisolated inputs.
The WarpRunner samples the divided tip volts from your plasma unit over 187'000 times per second, and then using DSP filters that down to obtain a stable voltage which is used to command Z velocities to the SmoothStepper 2'000 times per second! This results in very responsive Z motion to help you achieve the best cut quality possible with your hardware and materials.
The WarpRunner uses the same software and core functionality of the TMC3in1, but has improved hardware features that address shortcomings of the TMC3in1:
- A smaller and cleaner profile
- More LEDs to show input states
- Inputs 1 and 2 now feed directly into the ESS's Port 3 so that they can be read when the WarpRunner is not powered
- Various circuit improvements
- Better silk screen labeling
- The main 24V (or 12V) power pins are reversed compared to the TMC3in1. However, a reversed voltage protection diode has been added.
You need to add a Ethernet board: Ethernet SmoothStepper Motion Control Board for Mach3 and Mach4, 6 Axis (with cables)
Mach4 Software: Fully Licensed versions of Mach4, Email you the license.
Officially the WarpRunner will only run with Mach4. You may use the TMC3in1 plugin to run the WarpRunner with Mach3, but we will not support it other than the Mach3 TMC3in1 documentation. It is not worth our time or your time to run the WarpRunner in Mach3, please believe us and use Mach4 and SheetCam with the WarpRunner.
Download:
1: Here is the documentation for how to create WarpRunner log files:
Setup Instructions
It would be helpful to see the Mach4 log file too.
2: Pls generating the gcode using SheetCam:
SheetCam
3: Pls check the setup instructions as following:
https://documentation.warp9td.com/Hardware/WarpRunner/06_Connectors.htm
https://documentation.warp9td.com/Hardware/WarpRunner/Software_Mach4/d_Software_Setup.htm
There is sample gcode that could be tried. It includes all of the macros that the WarpRunner needs:
Sample GCode
Port 3 pins are assigned as follows:
- Port 3 Pin 1: WarpRunner RESERVED output (DON'T assign to anything)
- Port 3 Pin 2: J4 - M0 STEP (or other generic output)
- Port 3 Pin 3: J4 - M0 DIR (or other generic output)
- Port 3 Pin 4: J4 - M1 STEP (or other generic output)
- Port 3 Pin 5: J4 - M1 DIR (or other generic output)
- Port 3 Pin 6: J4 - M2 STEP (or other generic output)
- Port 3 Pin 7: J4 - M2 DIR (or other generic output)
- Port 3 Pin 8: J4 - M3 STEP (or other generic output)
- Port 3 Pin 9: J4 -M3 DIR (or other generic output)
- Port 3 Pin 10: Arc Okay (THC ON), REQUIRED input signal.
- Port 3 Pin 11: J6's generic Input #1
- Port 3 Pin 12: J6's generic input #2
- Port 3 Pin 13: WarpRunner RESERVED input for the velocity commands (DON'T assign to anything)
- Port 3 Pin 14: REQUIRED output for Anti Dive Mode 2 - Enable/Disable THC with M62/M63. Assign to one of the Output signals 0 through 63. You will use this output number instead of the pound sign in your GCode's "M62 P#" if you want to enable THC or "M63 P#" if you want to disable THC.
- Port 3 Pin 15: WarpRunner RESERVED input for the velocity commands (DON'T assign to anything)
- Port 3 Pin 16: XY PWM Velocity signal, a REQUIRED output for Anti Dive Mode 3 - Velocity. Assign to one of the Output signals 0 through 63.
- Port 3 Pin 17: Torch Relay, REQUIRED output. Assign to one of the Output signals 0 through 63. You will also need to enter this Output Number in the ESS Config -> H.C. -> Torch Relay Options. You will use this output number instead of the pound sign in your GCode's "M62 P#" if you want to turn the Torch relay ON or "M63 P#" if you want to turn the Torch relay OFF.
Height Control will adjust Motor 2, so use Motor 2 as your Z axis. Your Z axis MUST use Motor 2 for Height Control to work. Your X, Y and Z motors may use the designated output pins on Port 3 (as noted just above) or you may move them to Port 1 or Port 2 - any output pin is fine for any of the motor output signals. If you move your motor outputs to another port, then you may use the Port 3 Pins 2 through 9 as generic outputs.


Additional Details
 Updating...